Back to Content
Creating a First Person Shooter game - Tutorial
This tutorial shows how to create a first person shooter game - or ego shooter - using Coppercube, completely without programming.
The final application might look like this:
 The final application
Start - create your 3D scene
To start, we need a 3D scene or a world where the game can happen. Import a 3D Model, add a skybox, lights and whatever you want until you like the 3D scene. You can also
use the room generated built into CopperCube for creating a simple world by selecting the menu 'Edit -> Insert -> Create a room mesh from 2D map' and paint a nice room.
In this example, I've used 3D model of a big round room, and also placed a few lights to make it look more nicely:
 A scene for this example
Creating the player camera
Just like in the Creating a 3D Walkthrough tutorial, we now need a 3D camera which is controlled by the player, and which can walk around in the 3D world, without moving through walls. It also should be able to walk up stairs, and fall down with the gravity.
Click on the 'Scene editing' tab and click the camera symbol to create a new camera (Alternatively, use the menu: Edit -> Insert -> Create a Camera).
A dialog like this should appear:
 The camera creation dialog
Select the 'First Person Shooter Camera'. Also be sure that both options "Collides against geometry when moved" and "When starting the scene, this is the first active camera" is checked. Clicking 'OK' creates a new camera and selects it:
 The newly created first person shooter camera
Notice the yellow outline of an ellipsoid around the camera. This is the collision body, basically the size of the person walking around in the scene. Maybe you need to adjust the size of this ellipsoid, so that it matches your scene. You need to make it big enough that it is possible for the user to climb stairs, but small enough to fit through doors.
You can use the scale tool (shortcut 'R') to change the size of the ellipsoid.
Also, be sure that the yellow ellipsoid 'flies' a bit in the air and that it doesn't touch any wall or floor in the beginning, otherwise the user would be stuck in that wall at the start of the application and would not be able to move.
You can try if your camera is ok by testing your app, for example clicking Tools -> Test as Windows Application, and move around in your 3d scene a bit.
Now go to the properties window of the camera, open the 'Behaviors' tab and select the 'First Person Shooter style controlled' behavior:
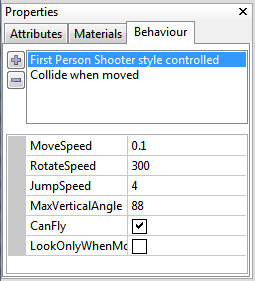 The behaviors of the created camera
You can set various options there, like the movement or rotation speed. If you want the camera to be able to fly instead of walk, you can check the 'CanFly' option, but for this tutorial, we don't use this feature.
The second behavior in the camera is the 'Collide when moved' behavior, which influences how the camera collides with its environment. You can adjust the size of the ellipsoid and the position of the camera in the ellipsoid. If you want to change the gravity, adjust the value of 'Gravity' which you can find when selecting the root node of the scene in the SceneGraph Explorer.
So now we have a camera which can move in the 3D world. But for a game, we need a bit more.
Creating enemies
As enemies, we will use some animated characters. There is a 'Soldier' prefab available which comes with CopperCube. In the prefab window, simple double click the "Animated soldier" and CopperCube should create an instance of this character in your 3D world. Place the soldier somewhere you like it to be.
 The first created enemy
If you are also using dynamic lights in your scene, you can make the soldier fit into the scene better by selecting it, opening its 'Materials' tab, and select 'Dynamic' as lighting.
Now, the character is simply an animated 3D model. It won't do anything in the game, so we need to tell it what to do. Select the soldier, open its behavior tab, and add a "Game Actor with Health (AI, Player, etc)" behavior to it:
 Adding the Game Actor behavior
Additionally, it is necessary that the enemy isn't able to walk through walls, just like the player camera. So we add a "Collide when moved" behavior to it as well, and adjust its values so that the yellow ellipsoid fits around the soldier:
 The collide-when-moved behavior added to the soldier
If you now test your application, by for example clicking "Tools -> Test as Windows Application", you will see that the soldier will move around randomly in the 3D world. It will ignore us completely, but at least it will do something useful. You can adjust its behavior easily in the "Game Actor with Health" behavior, see its documentation on the Behavior overview page.
You will see, are a lot of options which can be set there. For this example, we only adjust one single thing: Scroll down to the "ActionOnDie" entry, select it, click the "..." button, and in the "Edit Action" dialog, add a "Change rotation of a scene node" action, with the "Change which scene node" property set to the soldier, the vector set to "90.0, 0.0, 0.0", "Rotate animated" checked and the "Time to rotate" set to 500 milli seconds. Just as shown below:
 Our action which gets run when the Actor dies.
This action will be executed when the Actor dies. It could be useful to add further actions there, like playing a sound or similar, if you like. But the action we just added rotates the character so that it looks like it falls to the ground. We are doing this here because the soldier 3D model doesn't have a "death" animation built-in. You will see this in action later.
Adding a weapon
The one main feature of First Person Shooter games is that you can shoot stuff in them. So in order to do this, we need to add a weapon for the player. Select the camera again we created before, go to its behavior tab, and add a "When a key is pressed do something" behavior to it, you can find it under "Behaviors triggered by events". This will then start the shooting. You can select any key you want, but for this example, I selected the 'Left Mouse button' as shooting key. The behavior has one entry named "Action", select it, and click the "..." button and in the action edit dialog, add a "Shoot" action, which can be found under "game and sound":
 The "shoot" action added to the player camera.
For the shoot action, we set as Damage a value of about 55 (the default health for the enemy is 100, so you will have to hit him twice), and then click 'OK'. Basically, that's it.
Test your application, if you now aim at the enemy soldier and click the left mouse button, he should die after you hit him twice. Basically, you've just created a very, very basic first person shooter game.
Refining the game
Of course, the game is far from being finished. A lot of work is do be done. And it is out of the scope to explain every little detail in this tutorial, but here are some tips how to continue:
- Adding sounds: Everywhere you can add a action, you can also add more than one action. Like in the "ActionOnDie" trigger of the enemy. You can for example add a action to play a sound to make the enemy yell before he dies.
- Adding an animated 3D model of a weapon for the player: Simply import an animated or even not animated 3D model, and drag it in the scene graph explorer onto the player camera. Then, you probably need to adjust its position and rotation a bit unti it fits nicely into the screen. In the game, the model of the weapon will then be attached to the camera, follow it and be visible from the player as used to from First Person Shooter games.
- Making enemies also attack the player: In order to make the enemies attack the player, add a "Game Actor" behavior also to the camera, and set its mode to "This is the Player". You will also have to define what the enemy should do exactly when attacking, which you can do in the "ActionOnAttack" trigger of the game actor behavior. Usually, you would set a "shoot" action in there. Also notice the "Tags" set in all the Game Actor bahaviors, they are described in the Game Actor behavior description.
- More AI tweaking: Take a look at the Game Actor behavior description. There you will find much more options for the game AI.
- Adding more enemies: If you finished creating one enemy, you can basically clone it by clicking Ctrl+C. Also, copying and pasting behaviors from one node to another one is possible using CTRL+B and CTRL+J, or the context menu "Modify Selection -> Copy behaviors of this Node"
- Adding a crosshair: Use a 2D overlay node with an image of crosshair set onto it, placed in the middle of the screen in order to make aiming more easy.
- Making enemies feel more alive: The game actors have other triggers, like "ActionOnActivate", which gets executed when the player gets the first time into its activation radius. Play a sound for example there, in which the soldier says something in surprise.
That's it, now you should be able to create first person shooters with CopperCube on your own.

