WebsitePainter:     About     Download    Tutorials    FAQ    Documentation    Forum    Newsletter    Buy

How to create a Website (Tutorial)


Today, creating a website is quite simple. There are a lot of programs available which make it possible to create web pages without the need to know anything about HTML, JavaScript and similar. One of the easiest programs for this is WebsitePainter, which we are going to use in this tutorial.

Step 1: Download and install WebsitePainter

If you haven't done this yet, download and install the program Website Painter now.
  • Go to the websitePainter website by clicking this link.
  • Download the program from there. It is available for Windows as well as for Mac OS X.
  • Once downloaded, double-click the file to start the installer, and then finally start it.
The editor you just downloaded is everything you need to create websites, so now we can start creating your web page. It is free to try for 30 days, so plenty of time to create your website with it.


Step 2: Design your Website

When starting up the WebsitePainter editor, it will ask you to choose a template to start with. Select the empty page, and the editor will look about like this:
the html editor WebsitePainter

The big white area in the center is the first page of your website. On the right, you have a set of elements you can add to this page, like images, texts, buttons and so on. The 'Documents' window on the left shows all pages of your website, which is currently only one, named 'index.html'. And with the 'Properties' element on the lower left, you can modify the currently selected element. But more about all this later.

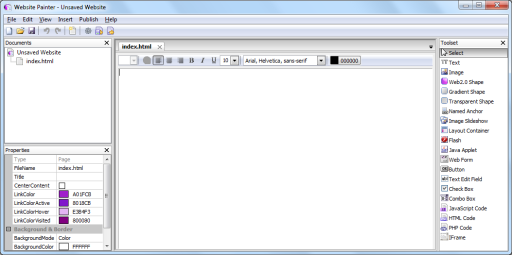
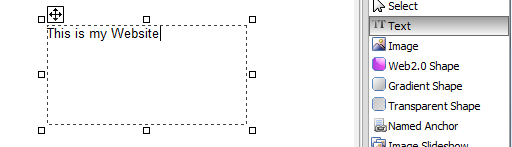
Now, click on the 'Text' element on the right to select it, and click into the website, where you want to place the text. A new text element will be created and you can type any text in there. Simply choose the name for your website, in this example, I used "This is my website":


If you don't like the position and size of the text element, simple move it by dragging the white rectangle with the arrows in it.
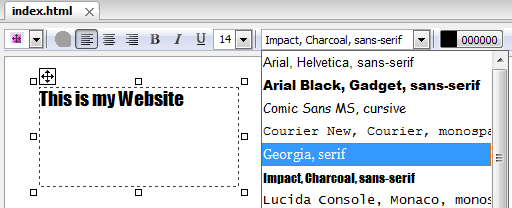
To make the text element look a bit more like a heading text, choose a nicer font and font size for it now: Ensure the element with your text is still selected and on the toolbar above the website, select a nicer font and font size:


Now you know how to create an modify text on your website, great. You can now fill the page with more text elements, and make it look like you want. The buttons in the toolbar above can make the text bold, italic, underlined and similar, and with the colored button showing the HTML color #000000 by default, you can select another color for the text. After some work, your texts may look like this:


Step 3: Buttons and Links

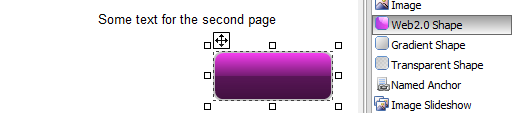
Because websites are nothing without links, we create another page and link it from our existing page. Click on the 'Add page' button in the toolbar, or choose the menu 'Insert' -> 'Add Page'.


WebsitePainter will then ask you if it should create a new empty page or copy an existing one, we choose to create a new empty one. the editor will then create and open a new page named something like 'UntitledPage1.html' which we can edit in the same way we were able to edit the first one. Add some text on this page so it isn't empty anymore. Now, add a Web2.0 shape to the page: Select 'Web2.0 shape' on the right and click onto the place where you want it to be:


When you click into the center of the newly created shape, you can start typing text which should appear there. Simply type 'back', for example. You can also adjust the color and font of the text, if you like, just like with the text elements:


If you would like to change the color of the button itself, simply select the shape and look into the 'Properties' window on the left. There you will find an entry 'GradientBegin' with the color. Simply select this and choose another one.
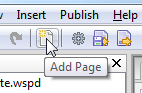
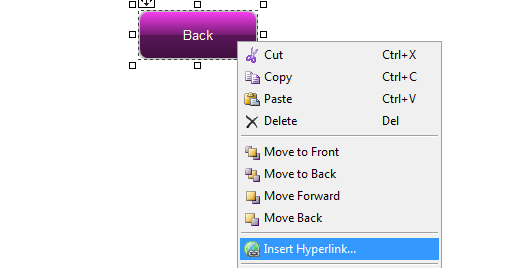
Now, we want that shape to behave like a button: If the user clicks on it, we want to go back to the main website we created first, named 'index.html'. For this, we need to create a 'hyperlink', which is very easy in WebsitePainter: Simply right-click the button and select 'Insert Hyperlink'.


Alternatively, you can also simply select the button and click the green 'Insert Hyperlink' button in the toolbar.
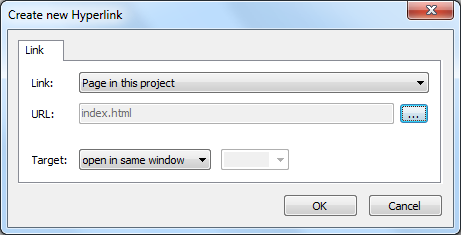
A dialog will show up, asking you to speciy where to link to. Simply select 'Page in this project', and as page use 'index.html'.


That's it, now your pages are linked. To see this in action, simply preview the page in the browser. Select the Menu Command 'Publish' -> 'Preview' or click on the toolbar button 'Preview' for this. The page will open in your local browser (Internet Explorer, Safari, Chrome, Opera or Firefox) and if you click on the button, the index.html page will open.

It is of course also possible to add hyperlinks to parts of text elements, or to pictures, and works the same way. If you want to link the second page also back from the 'index.html' page, you can add there a link back to that page of course as well.


Step 4: Publish your Website to the Internet

There are a lot of elements which haven't been covered in this tutorial, like pictures, anchors, flash, slideshows etc, but explaining them all in this short text of course isn't possible. Simply try them out yourself or take a look into the websitepainter documentation, it's easier than you might think.
But one little important piece not mentioned here yet is how to bring your website out to the internet. To do this, simply choose the menu command 'Publish -> Publish to the Internet'. A dialog will appear, asking you for the address and login data for the server. As address, you can specify an FTP server, such as ftp://ftp.yourhost.com. You usually get this information from your provider. When pressing 'ok', WebsitePainter will try to upload all the files to this server. Congratulations, your website is now online. Alternatively, you can also use an FTP client of your choice buy using the menu item 'Publish to local disk'.

And basically, that's it. You are now able to create professionally looking websites. Have fun!

If you have any questions or comments on this, don't hesitate to visit the WebsitePainter forum.


Copyright© Ambiera e.U. all rights reserved.
Contact | Imprint | Products | Privacy Policy | Terms and Conditions |